Gearing up for THE SOUND OF MUSIC, Part 1 (of many….)

Aside

Taking care of business this week!   The Sound of Music is really taking off, with rehearsals every day and sets being built.  I have been to 2 costume houses so far to rent costumes; Laguna Beach High School has a wonderful costume department, with an actual storage room under the theater.  I was quite impressed by their selection!  I also get costumes from The Theatre Company of Upland, it’s a drive (about 45 minutes) but well worth the miles, that place is bursting at the seams (oh yes I did go there), it has costumes 3 racks high, and very organized.

The Sound of Music is set in pre-WWII Austria in 1938, which means lots of fun vintage fashion.  So far I have 3 costumes planned to make.  The first is a vintage Vogue pattern that I thought would be great to have in our wardrobe department, Vogue Original Design from 1943:

Unknown

This dress will be for Elsa.  Cute day dress, the fabric I have is a vintage-looking black rayon/poly with orange poppies and bits of metallic gold.

Next is the classic Austrian outfit:

Unknown-1

I can’t decide if I am making this for Maria or some other character, but what theatre department is complete without this in their racks??

Finally, this musical needs costumes for quite a lot of ONE, Nuns and TWO, ball gowns!  So I have decided to make the red carpet knockout that any OSCAR would love to be squeezed by:

Unknown-2

In gold lame or something shimmery like that, with a beautiful organza flower on the shoulder.  Oh, AND THOSE GLOVES, ’cause who wouldn’t wear gloves?

Wish me luck!

TTFN, Janine

A little something for the baseball in me….

Standard

Don’t you just love Pinterest?  It is so fun to be inspired by the recipes, fashion, places to travel to, decorating ideas….  I could go on and on.  My latest find on Pinterest suits me perfectly!  It combines two parts of my life; my love for fashion & baseball.

86ba9d0aa06e092b6b110f9a3581cfd5

For those of you wondering where baseball fits in, I love a great baseball tee – you know, the 3/4 raglan sleeves, contrasting colors.  So I brought out a favorite pattern, Vogue 8670.

Unknown

Using lace on the sleeves works so perfectly for this tee.  I used a beautiful cotton/lycra lace and a ponte knit from Joann Fabrics.  It took less than a yard of fabric for both, so it really makes up inexpensively.  Can you see the gold flecks running through the lace…..Love!

IMG_0789

After a little pattern tweaking (I know, I just can’t help myself), like lowering the too high neckline, this top was such a snap to make and the pattern has a great shape to it;  definitely GIRLY, the fit is close but not too tight, and the longer more feminine hemline means I won’t be pulling it down constantly.   The one major change I made was to the sleeve pattern – it was a 2-piece sleeve, and since I didn’t want a seam running down the middle of my lace sleeve, I combined the pieces and fitted the sleeve to my arm.  All in all, with my Joann coupons this top was less than $15 to make.

IMG_0791

Excuse my lack of red eye reduction, I kind of botched this picture, but it was one of the best, so whatever.

IMG_0811

Since both fabrics have a good deal of stretch to them, this top is  soft, comfortable and washes well.  I can’t wait to make this again, perhaps in a brighter color combos.

IMG_0790I just have to find some soft cotton lace in dark red or gold, to wear when my son is pitching for his team, and I’ll be all set.   Play Ball!

TTFN!

Doing my own thing…..

Aside

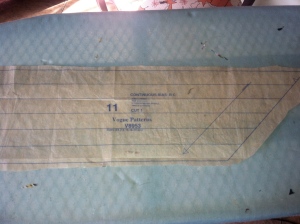
Continuing on with my search (from last year) for the perfect top, I came across this pattern, Vogue 8953, and I thought I’d give it a try.  Here are the specs:  Misses’ top, Very loose-fitting, pullover top has raglan sleeve variations and very narrow hems.  View A:  Elasticized neck and waistline, View B & C front neck slit, continuous bias for elasticized tie ends (neckline) and drawstring waist with casing, elasticized sleeves.

images-1

Pretty basic, should be a snap, right….?   I rarely follow pattern instructions, aside from confirming what I think will be the next step, so I made it my goal to follow the instructions.  Which turned out to be not so much.   (**sigh**)  The fabric I used was from my stash, a beautiful tribal poly chiffon from Joann Fabrics, part of their Summer 2013 collection.  This pattern is rated easy, but using such drapey slick fabric means you have to have skills, like patience (check), perseverance (um, not so much) improvisation (check) and finally, when to know when you are beat and do it your own way (double-check).  So, it wasn’t as easy as it looks.

When it comes to cutting out a pattern & fabric, let me just say this; will someone just do this for me?  Please?  For me it’s the worst part of starting a project.  You have to make sure the fabric is straight, you don’t forget a piece, you have enough fabric, a place to cut things out that is big enough, etc..  Ugh!  Since the fabric came before the pattern, of course I was a little short.  I got the main pieces  (front, back, sleeve, peplums and top facing) all cut out.  Then I saw it; the dreaded continuous bias pattern piece, used to make the ties and the waist band casing.  I have to say, I am so thankful that I didn’t have enough fabric for this piece.  I can just imagine painstakingly cutting this piece out, then cutting out the strips according to the directions only to have an uneven, unraveling piece of fabric that is good for nothing.  Or making a tiny drawstring only to turn it inside out and discover holes where the fabric unraveled.  A BIG NO TO THAT.

IMG_0749

Onward, time to sew.  Going with my instructions, I noticed right off in step one that I would have to improvise.  The instructions called for finishing off the slit in the upper front by hemming the edges.  Umm….. no!  Instead I chose to use a bias self fabric piece to finish off the edge, a much more finished looking result.

IMG_0757

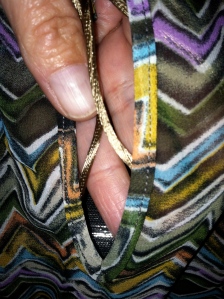
Since chiffon fabric unravels like crazy, seam finishing is a must.  I love french seams, they are easy to make, beautiful to look at and sturdy!   In addition, I rolled the hems for the sleeves and peplums, and finally followed instructions like a good girl (for a while, anyway).  I actually loved the directions for 2 parts of the construction quite a lot;  First was the casing on the sleeve – folding up the sleeve at a particular spot, stitching around to make a casing, then inserting elastic; boom!  that’s it!  And second, the facing at the neckline also forms a casing for the elastic and drawstring.  The results are a much softer neckline (packaged bias gets so bulky with chiffon, don’t you think?).  I purchased rattail cording for the neckline drawstring (sewn onto elastic), about 1 1/2 yds. total.

IMG_0758

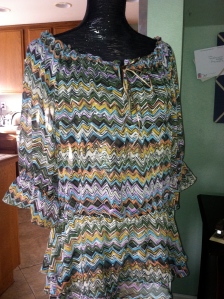
The double peplum pieces are curved, almost circular.  A nice feature, I think it pairs well with the other ruffly bits of this pattern.  I had cut the bodice front and back pieces 2 inches longer to accomodate my long torso and the need for another elastic casing around the waist.  Again, I totally skipped the instructions on this part, I felt that the tie with casing idea was a little too much – ruffles, ties, ruffles ties, it was getting a little crazy!  So the front bodice pieces and peplums were joined, a casing was made and elastic inserted, and that was that!

IMG_0768

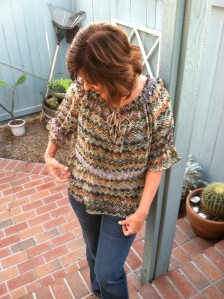
There you have it!  I think I would give this project a 4 out of 5 stars, because I liked the way it turned out.  Time consuming (about 7 hours total, 1.5 of them being cutting the thing out!!!), I really tried to stick to the instructions, but I JUST COULDN’T!

IMG_0769

TTFN!

Best Make of 2013

Standard

Because it’s the new year the temptation to look back to the successes and failures is for me, compelling. It helps me to decide what to plan to make for the year. This is kind of hard to do when you are an easily distracted person, or as I like to call it, an EDP. Maybe that should be my New Years’ resolution….. focus, focus.

I stumbled upon Simplicity 1543 one day while looking for something else; pulling out a pattern drawer at the local JoAnns, I looked up and there it was, in the discard pile(!), the perfect outfit to describe how I want to look on casual days.

1543

I snatched it up, took it home and immediately looked it up on PatternRevieweview.com, only to find that there weren’t (at the time) any reviews on this pattern. This was what I call Roadblock #1. Now I love PatternReview.com  because it allows me to see finished garments, sometimes of things I normally would have never give a chance. It also identifies problems, includes tips and advice from reviewers and all in all is a generally inspiring website. My particular pattern relies on artist drawings, with no real finished product to see. Yuck.

So my Simplicity Tunic pattern sat, while I finished up some project or another otherwise know as Roadblock #2. When I would come across it, I would look at it longingly until finally one day I decided to find some fabric and go for it. I got what I wanted, a beautiful poly/lycra blend sweater knit in a dull red heather. It has a nice slinky feel to it, and machine washes beautifully.

IMG_0745

Enter Roadblock #3. Overall, this was a very easy pattern to make up, but there were a couple of changes that were necessary for me to get what I wanted. First of all, in cutting out the top front piece, I noticed that the neckline was much narrower than the drawing depicted. But I left the piece as is and continued with cutting out other pieces. I noticed that the pocket piece was tiny, so I held off cutting it out. Onto sewing; after I attached the front and back pieces and applied the neckline facings, I tried it on. Yuck; the neckline was not at all like the pattern, so out came the seam ripper, then cutting out 1 inch on each side. After that I had to change the facings to fit the new neckline, and finally it was back to sewing. I ended up adding enough fabric to my pockets to make a more square shape, instead of 4″ wide rectangles.

Back to my EDP disorder, if you don’t mind….. I have been sewing long enough to know that proportion is very important in garments for myself. I am glad I paid attention because it really makes a difference in whether I wear something or not. Really, I find it hard to believe that a person can put their hands in a pocket this size. For some reason a vision of a t-rex waving it’s ineffective arms keeps popping into my head…..

NttBwB99RE-4

Anyway…. Don’t you love the sleeves on this pattern? Heaven. Easy to do, such a nice feature on this tunic. Way to go, Patty Reed Designers! After that, I finished the hem and then done! It was everything I wanted and more, I wear it all the time and have had compliments on it every time.

IMG_0603

This is definitely something you can put together for yourself (once you work out your own proportion bugs) in a couple of hours. Chic rating: 5 out of 5 stars!

IMG_0604

So completes my first blog post, another New Year’s goal.  I had some head scratching moments, but overall I am glad to accomplish this long awaited goal and hope to become faithful about posting my sewing adventures!

TTFN!